Few things are as disheartening as reaching for a refreshing glass of filtered water, only to discover an unwelcome green film adorning your clear pitcher. This green growth, typically algae, can transform your source of clean hydration into an unsightly and potentially concerning spectacle. While water filters work diligently to remove impurities, they inadvertently create an environment that, if not managed properly, can become a haven for these photosynthetic organisms. Understanding why algae thrive in your pitcher and implementing a few simple preventative measures can ensure your water remains crystal clear and genuinely refreshing.
What is Algae in Water Filters and Why It’s a Concern?
|
Our Picks for the Best Water Filter in 2026
As an Amazon Associate I earn from qualifying purchases.
|
||
| Num | Product | Action |
|---|---|---|
| 1 | everydrop® by Whirlpool Refrigerator Water Filter A - EDRARXD1 (Pack of 1) |

|
| 2 | E-3000UV Whole House Salt-Free Water Softener & Filter Combo with UV |
|
| 3 | Samsung HAF-QIN/EXP Genuine Refrigerator Water Filter, Reduces 99% of Harmful Contaminants for Clean, Clear Drinking Water, 6-Month Life, Easy Install, Pack of 1 |
|
| 4 | Brita Metro Water Filter Pitcher with SmartLight Change Indicator, BPA-Free, Replaces 1,800 Plastic Water Bottles a Year, Lasts Two Months, Includes 1 Filter, Small - 6-Cup Capacity, White |
|
| 5 | ZeroWater 20-Cup Ready-Pour 5-Stage Water Filter Dispenser with 0 TDS Water Filter – IAPMO Certified to Reduce Lead, Chromium, and PFOA/PFOS |
|
| 6 | ZeroWater 32-Cup 5-Stage Water Filter Dispenser with Instant Read Out - 0 TDS for Improved Tap Water Taste - IAPMO Certified to Reduce Lead, Chromium, and PFOA/PFOS |
|
| 7 | FRIGIDAIRE ULTRAWF Pure Source Ultra Water Filter, Original, White, 1 Count |
|
| 8 | everydrop by Whirlpool Ice and Water Refrigerator Filter 1, EDR1RXD1, Single-Pack , Purple |
|
| 9 | GLACIER FRESH Water Filter Compatible with XWFE (Built-in CHIP), Replacement for GE XWFE, XWF Refrigerator Water Filter NSF/ANSI 42 Certification Pack of 1 |
|
| 10 | Brita UltraMax Large Water Dispenser With Standard Filter, BPA-Free, Reduces Copper, Cadmium and Mercury Impurities, Lasts 2 Months or 40 Gallons, Includes 1 Filter, Kitchen Accessories, Large 27-Cup |
|
Algae are simple, plant-like organisms that use sunlight to convert carbon dioxide and water into energy through photosynthesis. They are ubiquitous, with spores naturally present in the air and even in your tap water. Once these spores find their way into your water filter pitcher, they can rapidly multiply under the right conditions, forming the slimy green or sometimes blackish growth you might observe.
The main concern isn’t always direct toxicity from the common green algae found in pitchers, which are generally harmless if ingested in small amounts. However, some species, particularly blue-green algae (cyanobacteria), can produce harmful toxins known as cyanotoxins, which may lead to symptoms like headaches, fever, or gastrointestinal issues. Even if not toxic, algae growth can provide a breeding ground for other bacteria and microorganisms, potentially leading to stomach upset and compromising the overall hygiene of your filtered water. Moreover, the presence of algae indicates less-than-optimal water quality and an unhygienic environment within your pitcher, detracting from the very purpose of having a filter.
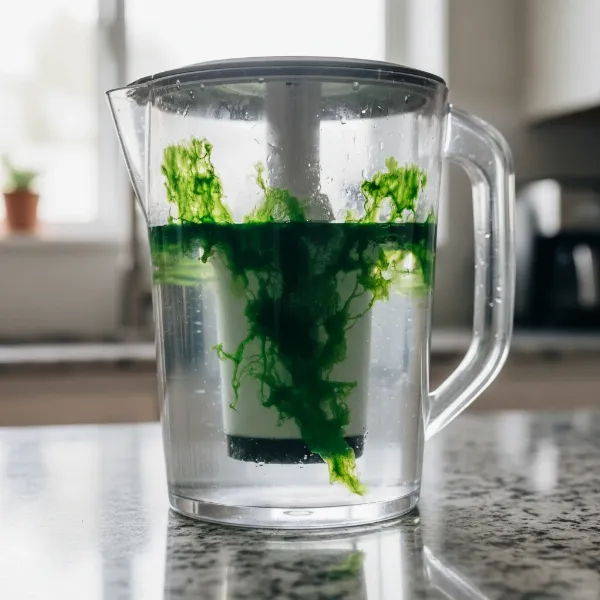 A clear water filter pitcher filled with water, showing visible green algae growth along the sides and bottom.
Common Culprits: Why Algae Thrives in Your Clear Filter Pitcher
Algae growth isn’t a mysterious phenomenon; it’s a direct response to specific environmental factors. Clear filter pitchers, by their very design, can inadvertently facilitate these conditions:
- Sunlight Exposure: As photosynthetic organisms, algae require light to grow. Clear pitchers, when left on countertops or near windows, allow sunlight to penetrate the water, providing the necessary energy for algae to flourish. Even indirect light can contribute to this problem over time.
- Warm Temperatures: Algae thrive in warm environments. A pitcher left out at room temperature, especially in a warm kitchen or during summer months, creates an ideal breeding ground for rapid algal multiplication.
- Absence of Disinfectants: City or mains water typically contains chlorine or chloramine, which act as disinfectants to inhibit microbial growth, including algae. However, the primary function of most water filter pitchers is to remove these chemicals to improve taste and odor. While beneficial for taste, this also removes the natural algaecide, leaving the filtered water vulnerable.
- Stagnant Water: Water that sits in the pitcher for extended periods provides a stable environment for algae spores to settle and grow without disruption. The longer water remains stagnant, the higher the chance of significant algae build-up.
- Environmental Spores: Algae spores are everywhere – in the air, dust, and even in your tap water. These microscopic spores can easily enter your pitcher through the air or during refilling, patiently waiting for the right conditions to germinate and grow.
“The moment your water filter removes chlorine, you’ve created a clean slate – not just for drinking, but potentially for algae too. Managing light and temperature becomes paramount.” – Rod Archdall, Water Filtration Expert at My Water Filter
Effective Strategies to Prevent Algae Growth
Preventing algae in your clear water filter pitcher involves a combination of smart placement, consistent cleaning, and mindful water management. By addressing the factors that contribute to algae growth, you can maintain a consistently clean and healthy water supply.
Strategic Placement and Storage
Where you keep your filter pitcher makes a significant difference in preventing algae.
- Refrigerate Your Pitcher: The simplest and most effective solution is to store your filter pitcher in the refrigerator. The cold temperature inhibits algae growth, and the dark environment of the fridge blocks sunlight. This also keeps your water pleasantly chilled.
- Choose a Dark, Cool Spot: If refrigeration isn’t feasible due to space constraints, select a cool, dark location for your pitcher. A pantry, a shaded cupboard, or a spot far from windows and heat sources (like stovetops or direct sunlight) can help.
- Use an Opaque Cover: For clear pitchers that must remain outside a refrigerator or cupboard, consider draping an opaque cloth or a tea towel over it. This simple barrier can block out light, effectively starving any nascent algae of the energy they need to grow.
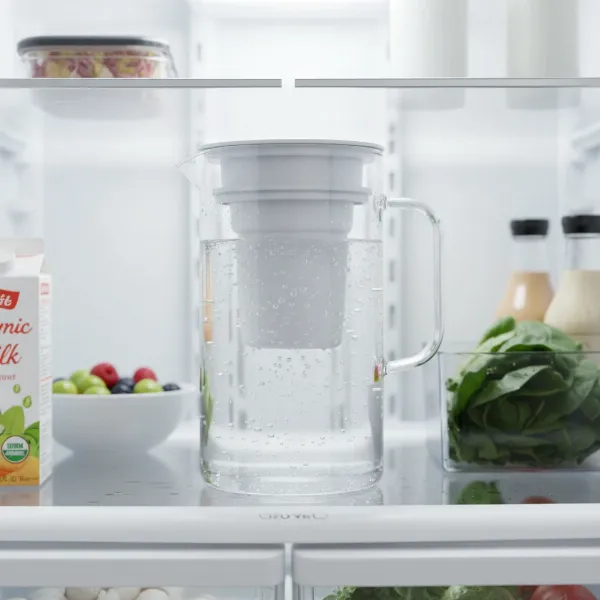 A clean water filter pitcher placed inside a refrigerator, illustrating proper storage for algae prevention.
Regular Cleaning Routine
Consistent cleaning is vital, even if you don’t immediately see algae. Think of it as preventative maintenance for optimal hygiene.
- Frequent Pitcher Cleaning: Aim to thoroughly wash your water pitcher every one to two weeks, or at the very least, each time you change the filter cartridge. This routine removes any microscopic spores or nascent algae before they can become visible problems.
- Disassemble for Deep Clean: When cleaning, always disassemble your pitcher entirely. Separate the lid, reservoir, and any other removable parts. Use mild dish soap and warm water with a soft sponge or brush to scrub all surfaces, paying close attention to crevices and corners where grime can accumulate. Rinse all components thoroughly to remove any soap residue.
- Filter Cartridge Care: It’s crucial not to use soap or detergents on the filter cartridge itself, especially ceramic types, as chemicals can damage the filter media or leach into your water. Instead, gently scrub ceramic cartridges under cool, running tap water with a non-scratch scourer pad to clean the outer surface. Activated carbon filters generally just need a rinse.
- Complete Drying: Before reassembling, ensure all parts, especially the filter cartridge and tanks, are completely dry. Air-drying upside down on a clean rack or towel is often recommended. This step prevents the immediate re-establishment of a damp, hospitable environment for microbes.
Mindful Water Management
How you use and refill your pitcher also impacts algae prevention.
- Don’t Let Water Sit for Too Long: While filtered water is fresh, it’s best consumed within 4-5 days. Regularly using and refilling your pitcher keeps the water circulating and reduces the chance of stagnation.
- Empty and Dry for Extended Non-Use: If you’re going on holiday or won’t be using your filter pitcher for an extended period, empty out any remaining water and allow the entire system to air dry completely before storing it. This eliminates the moist environment algae needs.
- Timely Filter Replacement: Always replace your filter cartridges according to the manufacturer’s recommendations (e.g., every 4 weeks or after a certain volume of water). Clogged or expired filters can become less effective at removing impurities and may even harbor unwanted biological growth.
Step-by-Step Guide: How to Clean an Algae-Contaminated Pitcher
If you’ve already spotted green growth in your pitcher, don’t despair! A thorough cleaning can bring it back to pristine condition.
- Disassemble: Carefully take apart all components of your water filter pitcher: the lid, upper tank, lower tank, filter cartridge, and any mineral pads or spouts.
- Initial Wash: Use warm water and a mild dishwashing liquid to wash the inside of the upper and lower tanks. Scrub thoroughly with a soft sponge or cloth, paying attention to any visible algae spots.
- Tackle Stubborn Algae: For persistent algae stains or a more thorough disinfection, prepare a solution of white vinegar (about 1 teaspoon per cup of water) or a diluted Milton solution (as per product instructions). Soak the affected plastic pitcher parts (excluding the filter cartridge) overnight, then scrub and rinse. Remember, do not use these solutions on the filter cartridge.
- Clean the Filter Cartridge: Rinse the ceramic filter cartridge gently under cool, running tap water. You can use a non-scratch scourer pad to remove any surface build-up. Avoid using any soap or harsh chemicals.
- Rinse Thoroughly: Rinse all cleaned components multiple times with clean water to ensure no soap or cleaning solution residue remains. This is crucial for maintaining water purity and taste.
- Dry Completely: Allow all parts to air dry completely before reassembling. Place them upside down on a clean dish rack or towel to ensure proper ventilation.
- Reassemble and Refill: Once everything is dry, reassemble your water filter pitcher and fill it with fresh tap water, ready for filtration.
Beyond Prevention: When to Consider a New Water Filter System
While consistent care can combat most algae issues, there are instances when persistent algae growth signals a need for a different approach or an upgrade.
If, despite diligent cleaning, proper storage, and timely filter changes, algae consistently reappears, your current system might be ill-equipped for your specific water quality challenges or environmental conditions. For instance, if you use rainwater which may naturally contain more microorganisms, a standard filter pitcher might not be sufficient. In such cases, exploring a more advanced filtration system, potentially with features like advanced activated carbon, silver-impregnated ceramics, or even UV sterilization, could be beneficial. These systems are designed to offer more robust protection against microbial contamination, ensuring peace of mind and genuinely clean water.
Conclusion
Maintaining a clear, algae-free water filter pitcher is a straightforward process when you understand the basic principles behind algae growth. By controlling light and temperature, establishing a consistent cleaning routine, and managing your filtered water usage, you can effectively prevent the unwelcome green slime from appearing. Remember to store your pitcher in a cool, dark place like the refrigerator, clean all components regularly with mild soap and warm water (avoiding detergents on the filter itself), and ensure water doesn’t sit stagnant for too long. Prioritizing these simple habits not only keeps your pitcher looking pristine but, more importantly, ensures your family always has access to the clean, safe, and delicious drinking water they deserve. What small change will you make today to keep your Water Filter pitcher sparkling clean?
Frequently Asked Questions
Why does algae grow so easily in filtered water when it didn’t in tap water?
Algae thrives in filtered water primarily because the filtration process removes chlorine and other disinfectants present in tap water. These chemicals naturally inhibit microbial growth. Once removed, and combined with exposure to light and warmth, the filtered water becomes an ideal environment for naturally occurring algae spores to multiply.
Is the green slime in my water filter pitcher harmful to drink?
While most common green algae found in household pitchers are generally not harmful in small amounts, it’s best to avoid drinking water with visible algae. Some blue-green algae can produce toxins, and any algae growth can create an environment for other bacteria to flourish, potentially leading to gastrointestinal discomfort. Always clean your pitcher immediately if you notice algae.
Can I clean my filter cartridge with bleach or strong chemicals?
No, it is strongly recommended not to use bleach, harsh detergents, or strong chemicals on your filter cartridge. These substances can damage the filter media, compromise its effectiveness, or leach into your drinking water. Instead, gently rinse the cartridge under cool, running tap water to remove any surface buildup.