For over a decade, my work in water filtration has shown me that while reverse osmosis (RO) systems are champions at delivering pure, clean drinking water, they aren’t set-and-forget appliances. Just like any high-performance system, an RO unit, especially its storage tank, requires regular attention to maintain optimal water quality and prevent potential health hazards. Neglecting this crucial task can lead to bacterial growth, impacting the taste and safety of your water. This comprehensive guide will walk you through the simple yet vital process of sanitizing your RO tank in just five easy steps, ensuring your family continues to enjoy pristine water for years to come.
Why Your RO System Needs Regular Sanitization
A reverse osmosis system works tirelessly to remove contaminants, but over time, microorganisms can accumulate within the system’s components, including the storage tank. This buildup, often referred to as biofilm, can lead to unpleasant tastes or odors in your filtered water and, more importantly, can compromise your water’s safety. Think of your RO system as a sophisticated water purification appliance; without proper cleaning, even the best systems can become a breeding ground for bacteria. Regular sanitization, ideally every 6 to 12 months or whenever you change your filters, is essential to combat these issues, protecting your health and extending the lifespan of your investment.
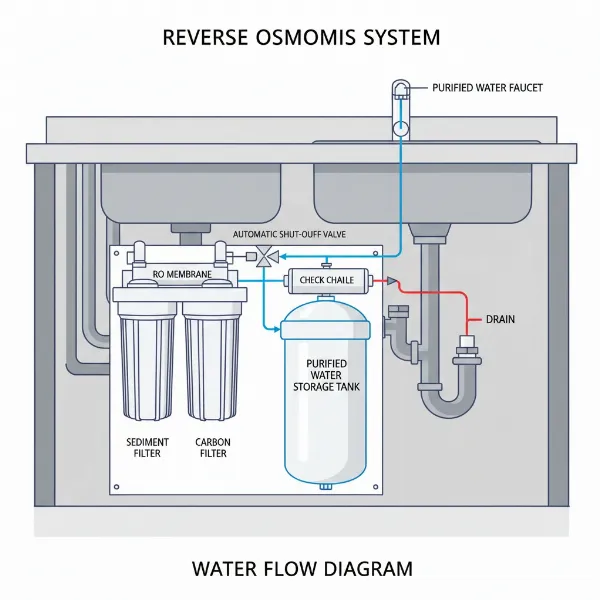 A diagram illustrating the components of a reverse osmosis system with focus on the tank needing sanitization
Choosing Your Sanitizer: Bleach vs. Commercial Solutions
When it comes to sanitizing your RO system, you generally have two effective options: unscented household bleach or a specialized commercial RO system sanitizer. Both have their merits, but it’s crucial to understand their differences to protect your system.
- Unscented Household Bleach (5.25% – 6% Sodium Hypochlorite): This is a readily available and cost-effective option. However, chlorine, the active ingredient in bleach, can damage the delicate RO membrane. Therefore, if you choose bleach, you must remove the RO membrane before introducing the sanitizing solution. A typical dilution is 1-2 teaspoons per gallon of your RO tank’s capacity.
- Commercial RO Sanitizers (e.g., Sani-System): These products are specifically formulated for RO systems and are often NSF-approved to kill 99.99% of harmful bacteria without harming the RO membrane. This means you generally do not need to remove the RO membrane when using these dedicated sanitizers, simplifying the process. Always follow the manufacturer’s instructions for dosage and contact time.
Regardless of your choice, safety is paramount. Always wear gloves and eye protection when handling sanitizing agents, and ensure adequate ventilation in your workspace.
Preparation is Key: What You Need Before You Start
Before diving into the sanitization process, gathering your supplies and preparing your workspace will make the task smoother and more efficient.
Here’s what you’ll need:
- Sanitizing Agent: Unscented household bleach or an NSF-approved RO system sanitizer.
- Gloves and Eye Protection: Essential for safety.
- Clean Towels or Rags: To wipe up any spills.
- Bucket or Container: For storing removed filters and potentially for mixing bleach solution.
- RO System Wrench: If your system uses traditional filter housings.
- New Filters and RO Membrane (Optional but Recommended): If you plan to replace components during sanitization, keep them in their original packaging until needed.
Pro Tip: Choose a time when you won’t need immediate access to purified water, as the process involves soaking and flushing, which can take several hours.
The 5 Easy Steps to Sanitize Your Reverse Osmosis Tank
Keeping your reverse osmosis water clean is paramount, and regular sanitization is a non-negotiable part of that commitment. Follow these five straightforward steps to ensure your RO tank remains free from microbial contaminants and continues to deliver the pure, fresh water you rely on.
Step 1: Shut Off Water Supply and Depressurize the System
|
Our Picks for the Best Water Filter in 2026
As an Amazon Associate I earn from qualifying purchases.
|
||
| Num | Product | Action |
|---|---|---|
| 1 | FRIGIDAIRE ULTRAWF Pure Source Ultra Water Filter, Original, White, 1 Count |

|
| 2 | Brita Metro Water Filter Pitcher with SmartLight Change Indicator, BPA-Free, Replaces 1,800 Plastic Water Bottles a Year, Lasts Two Months, Includes 1 Filter, Small - 6-Cup Capacity, White |
|
| 3 | Brita UltraMax Large Water Dispenser With Standard Filter, BPA-Free, Reduces Copper, Cadmium and Mercury Impurities, Lasts 2 Months or 40 Gallons, Includes 1 Filter, Kitchen Accessories, Large 27-Cup |
|
| 4 | everydrop by Whirlpool Ice and Water Refrigerator Filter 1, EDR1RXD1, Single-Pack , Purple |
|
| 5 | E-3000UV Whole House Salt-Free Water Softener & Filter Combo with UV |
|
| 6 | everydrop® by Whirlpool Refrigerator Water Filter A - EDRARXD1 (Pack of 1) |
|
| 7 | GLACIER FRESH Water Filter Compatible with XWFE (Built-in CHIP), Replacement for GE XWFE, XWF Refrigerator Water Filter NSF/ANSI 42 Certification Pack of 1 |
|
| 8 | Samsung HAF-QIN/EXP Genuine Refrigerator Water Filter, Reduces 99% of Harmful Contaminants for Clean, Clear Drinking Water, 6-Month Life, Easy Install, Pack of 1 |
|
| 9 | ZeroWater 20-Cup Ready-Pour 5-Stage Water Filter Dispenser with 0 TDS Water Filter – IAPMO Certified to Reduce Lead, Chromium, and PFOA/PFOS |
|
| 10 | ZeroWater 32-Cup 5-Stage Water Filter Dispenser with Instant Read Out - 0 TDS for Improved Tap Water Taste - IAPMO Certified to Reduce Lead, Chromium, and PFOA/PFOS |
|
Safety first! Begin by turning off the cold water supply valve connected to your RO system. This is typically located under your sink. Next, open your RO drinking water faucet and allow it to run until all the water has drained from the storage tank and the flow stops completely. This depressurizes the system and empties the tank, preparing it for cleaning.
Step 2: Remove Filters and RO Membrane (If Using Bleach)
With the system depressurized, it’s time to remove the filtration components. Carefully open the filter housings using your RO wrench and remove all pre-filters (sediment and carbon filters) and post-filters. If you are using unscented household bleach as your sanitizing agent, it is absolutely critical to also remove the RO membrane from its housing. Chlorine from bleach can severely damage the membrane, rendering it ineffective. Store all removed filters and the membrane in a clean bucket filled with water or a sealed bag to keep them moist and prevent damage, especially if you intend to reuse them after sanitization. If using an RO-safe commercial sanitizer, you may be able to leave the membrane in place; always check the specific product instructions. Re-secure all empty filter housings (except the one you’ll add sanitizer to).
Step 3: Add Sanitizing Solution to the System
Now, introduce your chosen sanitizing agent. Pour the appropriate amount of your commercial RO sanitizer or diluted bleach solution directly into the first filter housing (the one closest to the incoming water supply). If using a packet of Sani-System, simply squeeze the entire packet into this housing. If using bleach, ensure it’s mixed with water according to the recommended ratio for your tank size, then pour it in. Once the sanitizer is added, securely reattach the filter housing.
 A hand pouring a liquid sanitizer into an empty reverse osmosis filter housing
Step 4: Circulate and Let the Sanitizer Soak
With the sanitizer in place and all housings reattached, slowly turn the cold water supply back on. Allow the water to flow through the system, mixing with the sanitizer and filling the RO storage tank. You should hear the tank refilling. Once the tank appears full, or you hear the system stop producing water, turn off the water supply again. Now, let the sanitizing solution sit and work its magic. The recommended contact time varies by sanitizer: typically 60 seconds for Sani-System, but 30 minutes to several hours (or even overnight) for bleach, depending on your system and desired thoroughness. This soaking period allows the solution to thoroughly disinfect the tank’s interior surfaces and connected lines.
“Many users underestimate the importance of proper soak time. Giving the sanitizer adequate time to work is non-negotiable for effective disinfection, especially against stubborn biofilm.” – Dr. Elara Vance, Water Quality Specialist
Step 5: Flush the System and Reinstall Components
After the recommended soaking time, it’s time to flush the system. Turn on your RO drinking water faucet and let the water run continuously until the tank is completely drained. Then, turn the cold water supply back on to refill the system and tank with fresh water. Repeat this draining and refilling process at least 2-3 times, or more, until you can no longer detect any chlorine odor or taste from the faucet. This thorough flushing ensures all traces of the sanitizing agent are removed.
Once flushed, turn off the water supply one last time. Now, reinstall all your clean or new filters and, if previously removed, your RO membrane. Secure all housings, turn the cold water supply back on, and check for any leaks. Allow the RO system several hours to fully refill the storage tank with fresh, purified water before its first use. As an extra precaution, it’s wise to discard the very first full tank of water produced after sanitization.
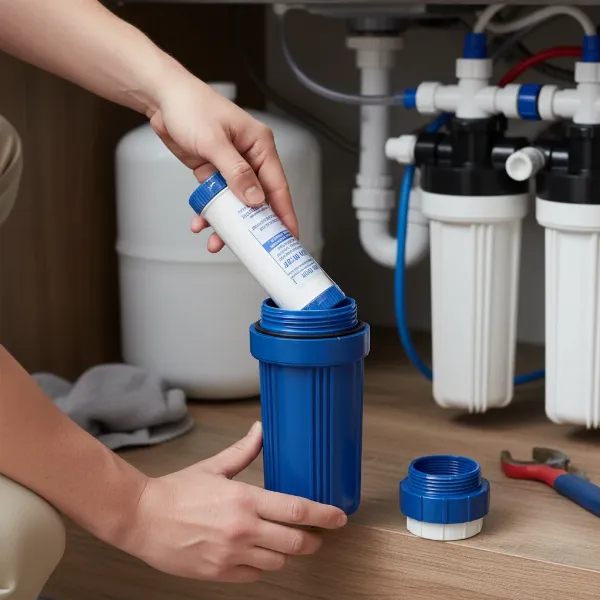 A person reinstalling a new RO filter into its housing
Maintenance Tips for a Long-Lasting RO System
Beyond annual sanitization, simple practices can significantly extend the life and efficiency of your RO system:
- Regular Filter Changes: Adhere to your manufacturer’s recommended schedule for replacing pre-filters, post-filters, and the RO membrane. Clogged filters reduce system performance and can contribute to bacterial growth.
- Check for Leaks: Periodically inspect your system for any signs of leaks, addressing them promptly to prevent water damage and ensure system integrity.
- Empty Tank Regularly: If you go on vacation or don’t use your RO system for an extended period, it’s a good idea to drain the tank and refill it with fresh water upon your return. For optimal freshness, some experts suggest emptying your bladder tank completely every 2-4 weeks by simply letting the faucet run dry.
Consistent maintenance not only guarantees cleaner, safer water but also helps you avoid costly repairs down the line.
Conclusion
Sanitizing your reverse osmosis tank is a fundamental aspect of owning an RO system, ensuring that the purified water you drink is not only free from impurities but also biologically safe. By diligently following these five easy steps—from initial shutdown and filter removal to thorough flushing and reinstallation—you can effectively eliminate biofilm and bacteria, maintaining peak performance and safeguarding your family’s health. Don’t let complacency compromise your water quality; make RO system sanitization a regular part of your home maintenance routine. What step in maintaining your RO system do you find most challenging, and how can we make it easier for you?
Frequently Asked Questions
How often should I sanitize my RO system?
It is generally recommended to sanitize your RO system once a year, or every time you replace your filters (typically every 6 to 12 months). You should also sanitize it after any extended periods of non-use, like after a long vacation, or if you notice any unusual tastes or odors in your filtered water.
Can I use regular household bleach to sanitize my RO tank?
Yes, you can use unscented household bleach (5.25%-6% sodium hypochlorite) to sanitize your RO tank. However, it is crucial to remove the RO membrane beforehand, as chlorine can cause irreparable damage to it. Always dilute bleach appropriately and flush thoroughly.
Do I need to remove the RO membrane if I use a commercial sanitizer?
Many commercial RO sanitizers, like Sani-System, are specifically formulated to be safe for RO membranes. If using such a product, you generally do not need to remove the membrane. Always consult the sanitizer’s instructions for specific guidance.
What if my RO water still tastes or smells strange after sanitizing?
If unusual tastes or odors persist after sanitization, it might indicate issues beyond bacterial growth, such as old filters, a compromised RO membrane, or an underlying problem with your water supply. It’s advisable to replace all filters and the membrane, or consult a water treatment professional if the problem continues.
How long does the sanitization process take?
The active sanitization process, including soaking and flushing, can take anywhere from 30 minutes to several hours, depending on the sanitizer used and the number of flush cycles. Additionally, you’ll need to allow a few hours for the RO tank to refill completely before using the water.