Waking up to the persistent sound of a dripping faucet can be incredibly annoying, especially when it’s your reverse osmosis (RO) system’s dedicated tap. Beyond the irritating noise, a dripping RO faucet wastes precious filtered water and can signal an underlying issue within your system. As an experienced technician with over a decade in water filtration, I understand the intricacies of these systems and the common frustrations homeowners face. This comprehensive guide will walk you through the primary reasons why your RO faucet might be dripping and provide clear, actionable steps to restore peace and proper function to your kitchen.
Understanding Your RO Faucet and Why it Drips
A reverse osmosis faucet is specifically designed to dispense purified water from your RO system. Unlike standard kitchen faucets, many RO faucets incorporate an “air gap” feature. This air gap is a critical safety mechanism that prevents contaminated drain water from siphoning back into your RO system or even your household’s potable water supply if the drain line becomes blocked. While essential, this feature can sometimes be a source of leaks if not properly maintained. A drip, whether from the spout or the air gap hole, indicates that something isn’t quite right. It could be a minor adjustment, a worn-out part, or a blockage requiring attention. Ignoring it not only leads to water waste but could also compromise the efficiency and longevity of your entire RO system.
Common Culprits: What Makes Your RO Faucet Drip?
Identifying the exact cause of your dripping RO faucet is the first step towards a lasting solution. Several factors can contribute to this common problem, ranging from simple wear and tear to system-specific issues.
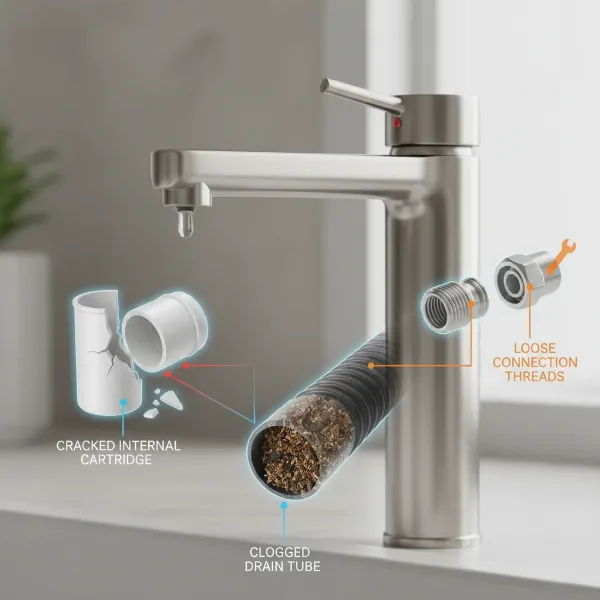
Worn Internal Components
|
Our Picks for the Best Water Filter in 2026
As an Amazon Associate I earn from qualifying purchases.
|
||
| Num | Product | Action |
|---|---|---|
| 1 | FRIGIDAIRE ULTRAWF Pure Source Ultra Water Filter, Original, White, 1 Count |

|
| 2 | E-3000UV Whole House Salt-Free Water Softener & Filter Combo with UV |
|
| 3 | GLACIER FRESH Water Filter Compatible with XWFE (Built-in CHIP), Replacement for GE XWFE, XWF Refrigerator Water Filter NSF/ANSI 42 Certification Pack of 1 |
|
| 4 | Brita UltraMax Large Water Dispenser With Standard Filter, BPA-Free, Reduces Copper, Cadmium and Mercury Impurities, Lasts 2 Months or 40 Gallons, Includes 1 Filter, Kitchen Accessories, Large 27-Cup |
|
| 5 | Samsung HAF-QIN/EXP Genuine Refrigerator Water Filter, Reduces 99% of Harmful Contaminants for Clean, Clear Drinking Water, 6-Month Life, Easy Install, Pack of 1 |
|
| 6 | ZeroWater 20-Cup Ready-Pour 5-Stage Water Filter Dispenser with 0 TDS Water Filter – IAPMO Certified to Reduce Lead, Chromium, and PFOA/PFOS |
|
| 7 | everydrop® by Whirlpool Refrigerator Water Filter A - EDRARXD1 (Pack of 1) |
|
| 8 | everydrop by Whirlpool Ice and Water Refrigerator Filter 1, EDR1RXD1, Single-Pack , Purple |
|
| 9 | Brita Metro Water Filter Pitcher with SmartLight Change Indicator, BPA-Free, Replaces 1,800 Plastic Water Bottles a Year, Lasts Two Months, Includes 1 Filter, Small - 6-Cup Capacity, White |
|
| 10 | ZeroWater 32-Cup 5-Stage Water Filter Dispenser with Instant Read Out - 0 TDS for Improved Tap Water Taste - IAPMO Certified to Reduce Lead, Chromium, and PFOA/PFOS |
|
Over time, the internal components of any faucet will experience wear. In an RO faucet, this often includes the washers, gaskets, or the faucet cartridge. These small, critical parts are responsible for creating a watertight seal when the faucet is closed. When they degrade or become damaged, they can no longer hold the seal effectively, leading to a constant drip from the spout. This is a very common issue, similar to leaks in conventional faucets.
Clogged Air Gap or Drain Line
Many RO faucets feature an air gap built into their design, typically visible as a small hole or opening near the base. The air gap connects to the RO system’s drain line, which carries rejected wastewater away. If this drain line or the air gap itself becomes partially or completely clogged with debris, minerals, or biofilm, the wastewater cannot flow freely. This blockage can cause water to back up and emerge as a leak from the air gap hole or even the faucet spout. Incorrect routing, such as dips or loops in the drain line, can also impede flow and lead to drips.
Loose Connections and Fittings
Beneath your sink, your RO faucet is connected to the RO system via several tubing lines and fittings. Over time, due to vibrations, temperature changes, or simply loosening from normal use, these connections can become slightly dislodged or lose their seal. A loose connection around the faucet base or where the water lines attach can result in slow leaks or drips. This is particularly common if the initial installation wasn’t perfectly secure.
High Water Pressure
Excessive water pressure entering your home can put undue stress on all plumbing components, including your delicate RO system and its faucet. High pressure can strain fittings, seals, and internal faucet mechanisms, making them more prone to failure and leaks. While your RO system is designed to handle a certain pressure range, consistently high input pressure can push it beyond its limits, leading to drips from various points.
 Close-up of a dripping reverse osmosis faucet with various causes highlighted digitally
Step-by-Step Troubleshooting and Repair Guide
Fixing a dripping RO faucet is a manageable DIY task for most homeowners. Follow these steps carefully to diagnose and resolve the issue.
Safety First: Turn Off the Water Supply
Before attempting any repair, always turn off the water supply to your reverse osmosis system. Locate the shut-off valve, usually found on the cold water line under your sink where the RO system is connected. Turn the valve clockwise until it’s completely off. It’s also a good idea to open the RO faucet briefly to relieve any residual pressure in the lines.
Identify the Leak Location
Observe where the water is dripping from. Is it coming directly from the spout? Is it leaking from the base of the faucet where it meets the countertop, or perhaps from the small air gap hole on the faucet body? The location of the drip provides a crucial clue to the underlying problem.
Check for Clogs (Air Gap/Drain Line)
If the leak is coming from the air gap hole or the faucet seems to be overflowing, a clog in the drain line is highly probable.
- Locate the Drain Line: This is typically a 3/8-inch tube running from your RO faucet’s air gap down to your sink’s drain pipe (usually connected via a drain saddle).
- Inspect for Blockages: Disconnect the drain line from the air gap and the drain saddle. Carefully check the tubing for any visible debris, mineral buildup, or kinks. You can try blowing air through the tube to test for obstructions or use a small brush for cleaning.
- Clear the Air Gap: If your faucet has an air gap, inspect the small hole for any blockages. Sometimes, a simple toothpick or a blast of compressed air (like an air duster) can clear minor obstructions.
- Ensure Proper Drainage: Verify that the drain line has a continuous downward slope to prevent water from pooling. There should be no significant dips or loops.
- Reconnect and Test: Reattach the drain line securely, turn on the water, and observe for drips.
Inspect and Tighten Connections
A common cause of leaks around the faucet base is loose connections.
- Examine Under the Sink: Look at all the tubing connections leading to and from your RO faucet under the sink.
- Gently Tighten: Using an appropriate wrench, gently tighten any fittings that appear loose. Be careful not to overtighten, as this can strip threads or crack plastic components, creating a bigger problem.
- Check for Damage: While inspecting, look for any signs of wear, cracks, or corrosion on the tubing or fittings. Replace any damaged components.
- Test: Turn the water supply back on and check for drips.
Disassemble Faucet and Inspect Internal Components
If the drip persists from the spout, especially after checking for clogs and loose connections, the issue likely lies within the faucet’s internal mechanism.
- Prepare: Place a towel under the faucet to catch any drips.
- Remove Handle/Spout: Carefully follow your faucet’s specific instructions to remove the handle and spout. This usually involves prying off a decorative cap, unscrewing a set screw, and then lifting off the handle. The spout might then simply pull off or unscrew.
- Access Cartridge/Washers: Once the handle and spout are removed, you’ll gain access to the faucet’s internal components, such as the cartridge, O-rings, and gaskets.
- Inspect and Replace: Examine these parts for signs of wear, cracks, or deterioration. Worn-out rubber washers or a faulty ceramic cartridge are frequent culprits. Take the old parts to a hardware store to ensure you purchase exact replacements.
- Clean: While the faucet is disassembled, gently clean any mineral buildup or debris from the interior surfaces.
- Reassemble: Install the new components, ensuring they are seated correctly. Reassemble the faucet in reverse order, being careful not to overtighten any screws.
- Test: Turn the water supply back on and check for leaks. You might need to make small adjustments to the handle or a tension screw (if present, like a brass tee on some models) to stop slow drips.
> “Persistent drips often point to internal wear. Don’t underestimate the impact of a tiny, worn-out O-ring on your faucet’s performance and your water bill.” – John Smith, Master Plumber & Water Filtration Expert
Address High Water Pressure
If you suspect high water pressure is contributing to your leak, or if you’ve had multiple plumbing issues, consider this:
- Test Your Water Pressure: You can buy a simple water pressure gauge at a hardware store and attach it to an outdoor spigot to check your home’s water pressure. Ideal pressure for most homes is between 40-60 psi.
- Install a Pressure Regulator: If your pressure is consistently above 80 psi, installing a whole-house pressure regulator (or adjusting an existing one) on your main water supply line can protect your plumbing, including your RO system. Consult a professional plumber for this task if you’re unsure.
Preventive Measures for a Drip-Free RO Faucet
Taking a few proactive steps can help keep your RO faucet in top condition and prevent future drips.
- Regular Maintenance: Follow the manufacturer’s recommendations for filter changes and system inspections. During filter changes, it’s a good time to quickly check connections and the drain line for any issues.
- Proper Installation: Ensure that your RO system and faucet are installed correctly, with all connections secure and the drain line properly sloped. If you’re unsure, consider professional installation.
- Monitor Water Pressure: Periodically check your home’s water pressure, especially if you live in an area known for fluctuations, and address high pressure proactively.
- Gentle Use: Avoid forcing the faucet handle or over-tightening it when turning off the water. Gentle operation can extend the life of internal components.
Conclusion
A dripping reverse osmosis faucet is more than just a minor annoyance; it’s a signal from your system that something needs attention. By systematically troubleshooting common culprits like worn internal components, clogged air gaps, loose connections, and high water pressure, you can often resolve the issue yourself. Remember to always prioritize safety by turning off the water supply before starting any work. With a little patience and the right steps, you can restore your RO faucet to its optimal, drip-free performance, ensuring your family continues to enjoy clean, pure water without waste. What steps will you take today to ensure your RO system remains perfectly efficient?
Frequently Asked Questions
How often should I replace my RO faucet cartridge?
The lifespan of an RO faucet cartridge varies, but typically they last several years. If your faucet starts dripping from the spout, especially after checking for clogs and tightening connections, it’s often a sign that the cartridge or internal washers need replacement. Consider replacing them every 3-5 years or when a drip becomes noticeable.
Can I use a regular kitchen faucet for my RO system?
No, it is not recommended to use a standard kitchen faucet for an RO system. RO systems require a dedicated, non-pressurized faucet that often includes an air gap for safety, preventing backflow contamination. Standard faucets are not designed for this and can compromise the purity of your filtered water.
What tools do I need to fix a dripping RO faucet?
Basic tools often include a Phillips head screwdriver, a flathead screwdriver, an adjustable wrench, needle-nose pliers, and possibly plumber’s tape. For cleaning clogs, an air duster or a small brush can be useful. Ensure you have replacement parts like O-rings, washers, or a new cartridge on hand if needed.