Imagine a constant supply of pure, refreshing water flowing directly from your kitchen faucet, free from the worries of contaminants and the hassle of bottled water. Installing an under-sink water filter is one of the most effective ways to achieve this, offering a discreet and powerful solution for your home’s water quality. As someone with over a decade of experience in water filtration, I’ve seen countless systems transform homes, and I’m here to assure you that a DIY under-sink water filter installation is a perfectly achievable project for most homeowners. This guide will walk you through everything you need to know, from selecting the right system to the step-by-step installation process and essential maintenance, ensuring your family enjoys clean, safe, and great-tasting water for years to come.
What is an Under Sink Water Filter? Why You Need One.
An under-sink water filter is a point-of-use filtration system discreetly installed beneath your kitchen sink, directly connected to your cold water supply line. Unlike whole-house systems that treat all water entering your home, under-sink filters focus on the water you drink and cook with, providing targeted purification right where you need it most. They typically filter water just before it reaches your faucet, ensuring maximum freshness.
The need for robust home water filtration has grown as municipal water, while treated, can still harbor various contaminants. Common impurities found in tap water include chlorine (used for disinfection, often leaving an unpleasant taste and odor), lead (from aging pipes), sediment, pesticides, herbicides, volatile organic compounds (VOCs), and emerging contaminants like PFAS. Even trace amounts of these substances can impact water taste, odor, and potentially pose long-term health risks. Installing an under-sink water filter actively removes these unwanted elements, significantly enhancing the safety and sensory quality of your drinking and cooking water. Beyond health, these systems offer unparalleled convenience by eliminating the need for single-use plastic bottles, saving you money, and reducing environmental waste.
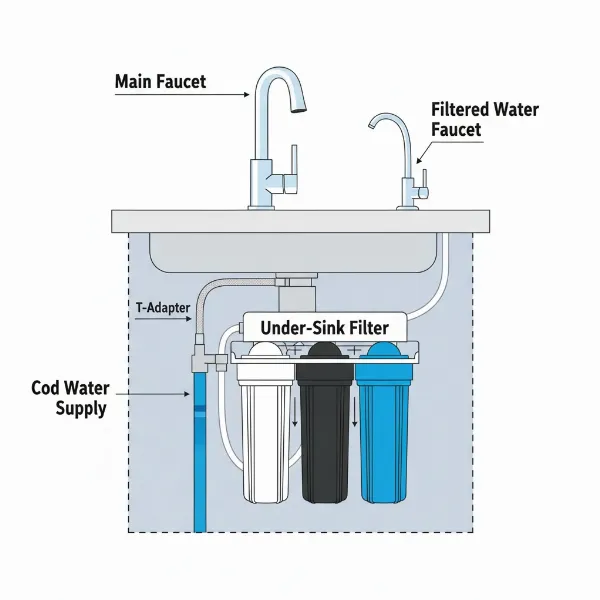 Diagram showing an under-sink water filter system connected to kitchen plumbing.
Understanding Different Types of Under Sink Water Filters
The world of under-sink water filters is diverse, offering various technologies to meet specific water quality needs and preferences. Understanding the core types will help you select the system best suited for your home.
Basic Single-Stage Filters (Carbon Block)
Basic single-stage filters, often utilizing carbon block technology, are the simplest and most budget-friendly under-sink solutions. They primarily excel at removing chlorine, basic sediment, and improving the taste and odor of your water. These straightforward systems typically connect directly to your existing cold water line, often without requiring a dedicated faucet, making them ideal for renters or those with minimal water quality concerns. While easy to install and maintain, their filtration capabilities are more limited compared to multi-stage or RO systems, making them suitable for areas with generally good water quality.
Multi-Stage Carbon Filters
Stepping up from basic single-stage options, multi-stage carbon filters offer a more comprehensive approach to water purification. These systems typically combine activated carbon with additional filtration media, such as KDF (Kinetic Degradation Fluxion) or specialized resins, to tackle a broader spectrum of contaminants. They are effective at removing chlorine, chloramines, lead, pesticides, herbicides, and volatile organic compounds (VOCs). Multi-stage carbon filters often come with a dedicated filtered water faucet, allowing you to choose between filtered and unfiltered water at your main tap, thus preserving the life of your filter for drinking and cooking. These systems strike an excellent balance between filtration effectiveness and ease of use, making them a popular choice for families seeking improved taste and comprehensive contaminant reduction.
Reverse Osmosis (RO) Systems
For the highest level of water purification, Reverse Osmosis (RO) systems are the gold standard among under-sink filters. RO technology forces water through a semi-permeable membrane, effectively removing 95-99% of dissolved solids, including minuscule contaminants like fluoride, arsenic, nitrates, and even bacteria and viruses. These systems typically include several pre-filters and post-filters, a storage tank, and a dedicated faucet, providing exceptionally clean water. However, RO systems are generally more complex to install due to the storage tank and a drain line connection (as they produce some wastewater), and they naturally have a slower flow rate and higher upfront costs. They are best suited for households with significant water contamination concerns or those desiring bottled-water quality directly from their tap.
Specialty Filters
Beyond the primary types, some under-sink systems may incorporate or specialize in other filtration technologies. For instance, Ultraviolet (UV) filters use UV light to kill bacteria and viruses, providing an extra layer of microbiological safety, often used in conjunction with other filtration methods. Ceramic filters, known for their porous material, are excellent at trapping bacteria and pathogens. While less common as standalone under-sink units, these specialty filters can be crucial for addressing specific water quality issues not fully covered by carbon or RO systems.
Choosing the Right Under Sink Water Filter: Factors to Consider
Selecting the perfect under-sink water filter goes beyond just picking a type; it involves a careful assessment of your specific needs and household conditions. Here are the key factors to consider for an informed decision:
To ensure you invest in the most suitable under-sink water filter, begin with Water Quality Assessment. A home water test kit or a professional water analysis can identify the specific contaminants present in your water supply. Knowing what you need to remove (e.g., lead, PFAS, chlorine, hard minerals) will directly guide you to the appropriate filtration technology. For instance, if lead is a concern, ensure the filter is certified for lead removal.
Next, measure the Available Space Under Your Sink. Under-sink filters vary significantly in size. Single-stage filters are compact, while multi-stage carbon systems and especially Reverse Osmosis (RO) units with their storage tanks, require more room. Carefully consider existing plumbing, garbage disposals, and other storage items to ensure the filter fits comfortably and allows easy access for future maintenance.
Your specific Contaminant Removal Needs are paramount. Different filters target different impurities. Activated carbon is excellent for taste, odor, and chlorine, but won’t remove fluoride or dissolved solids. RO systems offer the broadest contaminant reduction. Match the filter’s capabilities to your water test results and health concerns.
Budget considerations involve both the initial purchase price and the long-term cost of filter replacement. While an RO system might have a higher upfront cost, its longer-lasting membranes could make it more cost-effective over time compared to frequently replacing cartridges in a basic system. Always calculate the annual cost of filter replacements.
Consider the Flow Rate and Capacity of the system. Flow rate dictates how quickly filtered water dispenses from the faucet. If you have a large family or frequently use filtered water for cooking, a higher flow rate or larger capacity system will be more convenient. Capacity refers to the volume of water a filter can process before needing replacement.
Finally, always check for Certifications from reputable organizations like NSF International (National Sanitation Foundation) or the Water Quality Association (WQA). These certifications ensure that the filter has been independently tested and verified to perform as claimed by the manufacturer, providing peace of mind regarding its effectiveness and safety.
Essential Tools and Materials for DIY Installation
Embarking on a DIY under-sink water filter installation requires a few basic tools that most homeowners already possess, along with the components supplied in your filter kit. Having everything ready before you start will ensure a smooth and efficient process.
For general plumbing connections, an adjustable wrench is indispensable for tightening nuts and fittings. You’ll need Phillips and flathead screwdrivers to secure mounting brackets and other components. A power drill (with appropriate drill bits) is often necessary for creating a hole for a dedicated filtered water faucet if your sink or countertop lacks one. To precisely cut the flexible tubing included with most filter systems, a tubing cutter or sharp utility knife/scissors will be invaluable. Teflon tape (also known as plumber’s tape) is crucial for sealing threaded connections and preventing leaks. Lastly, always keep a bucket or towel handy to catch any residual water when disconnecting lines, and consider safety goggles to protect your eyes. Your under-sink water filter kit itself will contain the main filter housing, cartridges, tubing, a T-adapter or saddle valve for connecting to the cold water line, a dedicated faucet (if included), and mounting hardware, along with detailed manufacturer’s instructions which should always be followed closely.
Step-by-Step Under Sink Water Filter Installation: Your DIY Guide
Installing an under-sink water filter is a rewarding project that significantly upgrades your home’s water quality. While specific steps may vary slightly depending on your filter model and plumbing setup, this comprehensive guide covers the general process you’ll follow.
Preparation is Key
Before you grab any tools, turn off the cold water supply to your kitchen sink. Locate the cold water shut-off valve, typically found under the sink, and turn it clockwise until it’s completely closed. Then, open your kitchen faucet to relieve any residual water pressure and drain any remaining water from the lines. Next, clear the cabinet space beneath your sink. Remove all cleaning supplies, waste bins, and anything else that might obstruct your workspace or the filter’s future location. Finally, unpack your under-sink water filter kit and inspect all components to ensure everything is present and undamaged before you begin.
Installing the Filtered Faucet (If Applicable)
Many under-sink water filters include a dedicated filtered water faucet. If your system requires one, choose a suitable location on your sink or countertop, ensuring it’s easily accessible and has enough clearance for filling containers. Often, you can utilize an existing unused hole, such as one from a soap dispenser or sprayer. If no suitable hole exists, you’ll need to drill a new one. For stainless steel sinks, a standard drill and appropriate drill bit will suffice. However, if you have a granite, quartz, or other stone countertop, consider using a specialized diamond-tipped drill bit or hiring a professional to avoid damaging the surface. Once the hole is ready, insert the faucet through, ensuring any rubber gaskets are properly seated between the faucet and the sink surface. From underneath the sink, tighten the mounting nut to secure the faucet firmly in place.
Connecting to the Cold Water Line
This step integrates your filter system into your home’s plumbing. Locate the cold water supply line that feeds your main faucet. You’ll typically install a T-adapter or saddle valve (provided in most kits) onto this line. For T-adapters, you’ll need to disconnect the existing cold water line from the shut-off valve, attach the adapter, and then reconnect the main line. For saddle valves, you’ll clamp it onto the cold water pipe and pierce a small hole as per manufacturer’s instructions. Ensure all connections are tight. Then, connect the filter’s inlet tubing to the T-adapter or saddle valve. Use Teflon tape on any threaded connections to create a watertight seal and prevent leaks.
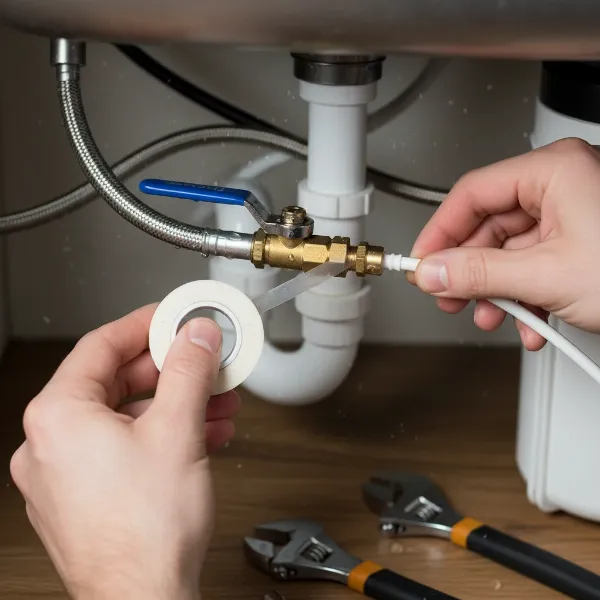 Hands connecting an under-sink water filter to the cold water supply line.
Mounting the Filter Housing
Select a suitable location for the filter housing inside the under-sink cabinet. It should be easily accessible for future filter changes, with sufficient clearance around the cartridges. Use a pencil to mark the screw holes for the mounting bracket. Before drilling, double-check that no pipes or wires are behind your chosen spot. Drill pilot holes into the cabinet wall, then secure the mounting bracket using the provided screws, ensuring it’s level and sturdy enough to hold the filter’s weight. Finally, attach the filter housing to the bracket, ensuring it’s securely fastened and the filter cartridges are properly seated according to the manufacturer’s directions.
Connecting the Filter Outlet to the Faucet
With the filter housing mounted, connect the filter’s outlet tubing from the filter housing to the stem of your newly installed dedicated faucet. If your system connects directly to your existing cold water faucet (without a dedicated filtered water tap), you will connect the filter’s outlet directly back into the cold water line, post-filtration. Measure the tubing accurately and use a tubing cutter for clean, straight cuts. Firmly push the tubing into quick-connect fittings until it’s snug, or tighten compression fittings with your adjustable wrench, being careful not to overtighten. Again, apply Teflon tape to any threaded connections for a leak-proof seal.
System Flush and Leak Check
This is a critical final stage. Slowly turn the cold water supply back on at the shut-off valve. Listen for any rushing water or unusual noises. With the water flowing, flush the system by opening the dedicated filtered water faucet (or your main kitchen faucet if it’s a direct-connect system) and letting the water run for several minutes, or as directed by the manufacturer. This removes air from the lines and flushes out any loose carbon fines or debris from new cartridges, which might initially cause cloudy water. Once the water runs clear and steady, thoroughly inspect all connections for any signs of leaks, drips, or seepage. If you find a leak, immediately turn off the water, tighten the connection, and re-check. A small bucket or leak detection pad can be placed under the system for added peace of mind.
Maintaining Your Under Sink Water Filter for Optimal Performance
Proper maintenance is paramount to ensuring your under-sink water filter continues to deliver clean, great-tasting water and functions efficiently for its entire lifespan. Regular care primarily revolves around filter replacement and routine checks.
The most crucial aspect of maintenance is adhering to the Filter Replacement Schedule. The lifespan of filter cartridges varies significantly by type and manufacturer; basic single-stage filters might need replacement every 3-6 months, multi-stage carbon filters typically every 6-12 months, and Reverse Osmosis (RO) membranes every 18-24 months. Overlooking these schedules can lead to reduced filtration efficiency, slower water flow, and potential re-contamination. You’ll notice Signs it’s time for replacement if your filtered water flow rate significantly decreases, the original chlorine taste or odor returns, or you observe visible sediment in the filtered water.
For Quick Maintenance Tips, mark your replacement dates on a calendar or set reminders on your phone to stay organized. Keep spare filters on hand so you can replace them promptly when needed. Periodically, at least once a month, check for leaks around all connections and the filter housing, especially after filter changes. A small leak detection pad can be a valuable addition. Also, monitor your water pressure; a consistent drop could indicate a clogged filter. Replacing filters according to guidelines not only ensures continuous access to purified water but also extends the overall lifespan of your filtration system.
Troubleshooting Common Installation and Operation Issues
Even with careful DIY installation, you might encounter minor issues. Knowing how to troubleshoot common problems can save you time and the expense of a service call.
If you experience Slow Water Flow from your filtered tap, the most common culprit is a clogged filter cartridge that needs replacement. Reduced water flow can also be caused by kinks in the tubing, a shut-off valve that isn’t fully open, or trapped air within the system. For RO systems, slow flow is somewhat normal, but a drastic reduction points to a clogged membrane or pre-filters.
Leaks are another frequent concern, especially right after installation. Most leaks stem from loose connections, damaged O-rings, or incorrect tubing installation. Immediately shut off the water supply if a leak occurs, tighten all fittings, check that O-rings are correctly seated and not pinched, and ensure push-fit connections are fully engaged. Using Teflon tape on threaded connections can prevent many leak issues.
If your filtered water develops an Unusual Taste or Odor, it almost always indicates filter saturation, meaning the cartridges have reached their capacity and need replacing. In RO systems, a bad taste could also signal a contaminated storage tank that needs sanitizing.
Experiencing No Water Production at all from your filtered tap warrants checking several points: ensure the main water supply and the filter’s ball valve (if present) are fully open, confirm filters are installed correctly (not backward), and check for any completely blocked hoses.
Finally, Noisy Operation—such as gurgling sounds or vibrations—usually suggests air trapped within the system or loose components. Running water continuously for a few minutes can often purge air pockets. If vibrations persist, inspect mounting brackets and fittings, tightening any that are loose.
Cost-Saving Tips for Under Sink Water Filter Owners
Owning an under-sink water filter is inherently a cost-effective way to access clean water, significantly reducing expenses compared to buying bottled water. However, there are additional strategies you can employ to maximize your savings.
One effective tip is to choose under-sink filters with longer-lifespan cartridges. While these might have a slightly higher upfront cost, their extended service intervals (e.g., 12-month or 24-month replacements versus 3-6 months) translate to fewer purchases and less frequent maintenance over time. Additionally, consistent and regular maintenance, particularly adhering to recommended filter replacement schedules, prevents premature clogging and damage to the system. A well-maintained filter system operates efficiently and avoids costly repairs or early replacements of entire units. You can also buy genuine replacement filters in bulk or during sales events to reduce the per-unit cost. Many manufacturers offer subscription services that provide discounts and ensure you always have fresh filters when needed. Lastly, by using your filtered water for all cooking and beverage preparation, you eliminate the need for costly bottled water or pitcher filters, further enhancing your long-term savings.
Conclusion
Installing an under-sink water filter is a powerful and practical upgrade for any home, offering a continuous supply of clean, great-tasting water right at your fingertips. By confidently undertaking this DIY project, you’re not just installing a device; you’re investing in your family’s health, reducing your environmental footprint, and saving money in the long run. Remember that the success of your installation hinges on careful preparation, understanding your system’s specific requirements, and diligent maintenance. With the right tools and a step-by-step approach, you can easily achieve the purity and convenience that an under-sink water filter provides.
Are you ready to transform your tap water and enjoy the benefits of pristine, filtered water every day?
Frequently Asked Questions
Can I install an under-sink water filter myself?
Yes, most homeowners can install basic under-sink water filter systems with standard tools and some basic plumbing knowledge. While complex Reverse Osmosis (RO) systems might require more experience or professional help, many carbon block and multi-stage carbon filters are designed for straightforward DIY installation. Always follow the manufacturer’s specific instructions.
How long do under-sink water filters last?
The lifespan of under-sink Water Filters varies. Filter cartridges typically last 3-12 months, depending on the filter type (single-stage, multi-stage, RO membrane), your water quality, and daily usage. The main system housing, with proper maintenance and regular filter changes, can often last 5-10 years or even longer.
Do under-sink filters remove fluoride?
Standard carbon-based under-sink filters generally do not remove fluoride. For effective fluoride removal, you will need a Reverse Osmosis (RO) system, which can eliminate 95% or more of fluoride along with other dissolved minerals and contaminants from your drinking water.
What’s the difference between under-sink and whole-house filters?
Under-sink filters are “point-of-use” systems, filtering water at a single tap (usually the kitchen sink) for drinking and cooking. Whole-house filters, on the other hand, are “point-of-entry” systems that treat all water entering your home, protecting all faucets, showers, and appliances from contaminants like sediment, chlorine, and hard water minerals.