Imagine turning on your tap and knowing that every drop of water is crisp, clean, and safe. That’s the promise of a water filter. But before you can fully enjoy this peace of mind, there’s a crucial, often overlooked step: flushing your new water filter. This isn’t just a recommendation; it’s an essential procedure to ensure your filter performs at its best from day one, delivering the pure water your household deserves. Ignoring this simple process can lead to cloudy water, strange tastes, and even a shorter filter lifespan. Let’s dive into why flushing is so important and how to do it correctly for various filter types.
Understanding Water Filter Flushing: Why It’s Non-Negotiable
Flushing a new water filter involves running water through the system for a specific duration before you begin consuming the filtered water. This initial rinse is vital for several reasons, ensuring your filter is properly prepared and your water quality is top-notch.
The primary goal of flushing is to eliminate carbon fines and manufacturing residue. Most water filters, especially those utilizing activated carbon, contain tiny particles of carbon dust that are a natural byproduct of the manufacturing process. These “carbon fines” are harmless but can make your water appear cloudy, grey, or leave small black specks if not flushed out. Beyond carbon dust, new filters can also contain other benign residues from their production and packaging, which flushing effectively washes away.
Another critical reason to flush is to remove trapped air. When a new filter is installed, air can become lodged within the filter media and housing. This trapped air can cause sputtering from your faucet, reduce water flow, and even compromise the filter’s effectiveness by creating channels where water bypasses the filtration media. Flushing helps expel these air pockets, allowing for smooth, consistent water flow and optimal filtration.
Furthermore, flushing activates and conditions the filter media. For activated carbon filters, running water through them helps to fully saturate the carbon and prepare it for its adsorption duties, ensuring it’s ready to effectively capture impurities like chlorine and volatile organic compounds (VOCs). This conditioning process is key to getting the most out of your filter’s performance.
Ultimately, proper flushing ensures pure taste and odor-free water. Without this initial rinse, your first few glasses of filtered water might have an off-putting taste, a plastic-like odor, or even a lingering chlorine smell due to un-flushed residues or unconditioned carbon. By taking the time to flush, you guarantee that your filter delivers the clean, refreshing taste it was designed for. This simple step also contributes to extending your filter’s lifespan and overall efficiency, as it prevents early clogging from loose particles and ensures the filter operates as intended.
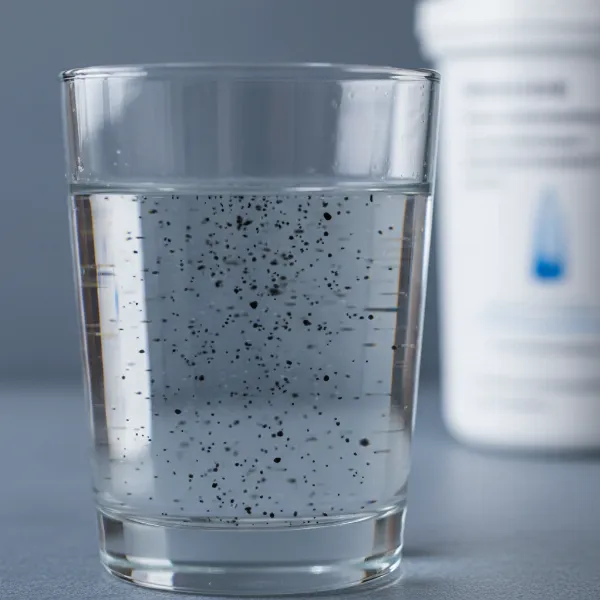 A close-up image showing small black carbon specks being flushed out of a new water filter.
Step-by-Step Guide: Flushing Your Specific Water Filter Type
The flushing process can vary slightly depending on the type of water filter you have. Always consult your filter’s manufacturer instructions first, as they provide the most accurate guidance for your specific model. However, here are general steps for common filter types:
Pitcher Water Filters
|
Our Picks for the Best Water Filter in 2026
As an Amazon Associate I earn from qualifying purchases.
|
||
| Num | Product | Action |
|---|---|---|
| 1 | GLACIER FRESH Water Filter Compatible with XWFE (Built-in CHIP), Replacement for GE XWFE, XWF Refrigerator Water Filter NSF/ANSI 42 Certification Pack of 1 |

|
| 2 | E-3000UV Whole House Salt-Free Water Softener & Filter Combo with UV |
|
| 3 | Brita UltraMax Large Water Dispenser With Standard Filter, BPA-Free, Reduces Copper, Cadmium and Mercury Impurities, Lasts 2 Months or 40 Gallons, Includes 1 Filter, Kitchen Accessories, Large 27-Cup |
|
| 4 | ZeroWater 20-Cup Ready-Pour 5-Stage Water Filter Dispenser with 0 TDS Water Filter – IAPMO Certified to Reduce Lead, Chromium, and PFOA/PFOS |
|
| 5 | Samsung HAF-QIN/EXP Genuine Refrigerator Water Filter, Reduces 99% of Harmful Contaminants for Clean, Clear Drinking Water, 6-Month Life, Easy Install, Pack of 1 |
|
| 6 | everydrop® by Whirlpool Refrigerator Water Filter A - EDRARXD1 (Pack of 1) |
|
| 7 | Brita Metro Water Filter Pitcher with SmartLight Change Indicator, BPA-Free, Replaces 1,800 Plastic Water Bottles a Year, Lasts Two Months, Includes 1 Filter, Small - 6-Cup Capacity, White |
|
| 8 | everydrop by Whirlpool Ice and Water Refrigerator Filter 1, EDR1RXD1, Single-Pack , Purple |
|
| 9 | FRIGIDAIRE ULTRAWF Pure Source Ultra Water Filter, Original, White, 1 Count |
|
| 10 | ZeroWater 32-Cup 5-Stage Water Filter Dispenser with Instant Read Out - 0 TDS for Improved Tap Water Taste - IAPMO Certified to Reduce Lead, Chromium, and PFOA/PFOS |
|
These are among the simplest to flush.
- Preparation: Some pitcher filters recommend soaking the new filter cartridge in water for 10-15 minutes before installation to remove air bubbles.
- Initial Fills: Install the filter cartridge according to the manufacturer’s instructions. Fill the pitcher with tap water and allow it to filter through completely.
- Discard and Repeat: Discard the first 2-3 full pitchers of filtered water. You might notice some carbon dust in the first batch, which is normal. The subsequent fills should run clear. After this, your pitcher filter is ready for use.
Faucet-Mounted Water Filters
These attach directly to your existing faucet and are relatively straightforward.
- Installation: Attach the new filter unit to your faucet as per the instructions.
- Run Cold Water: Turn on the cold water to a steady, medium flow.
- Flush Duration: Allow the water to run through the filter for approximately 5 minutes, or as specified by your filter’s manual. During this time, you might see cloudy water or small black particles, which should clear up.
Refrigerator Water Filters
Flushing a refrigerator filter ensures clean water and ice.
- Installation: Install the new filter cartridge into your refrigerator’s filter housing.
- Dispense Water: Place a large container (e.g., a gallon jug or pot) under the water dispenser. Dispense water continuously.
- Volume: Flush 3-5 gallons of water through the dispenser. This can take several minutes, and you may need to empty the container multiple times. If your dispenser automatically stops, dispense in intervals.
- Ice Maker: For refrigerators with an ice maker, discard the first two to three batches of ice produced after the filter change. This ensures any carbon fines or trapped air are removed from the ice line.
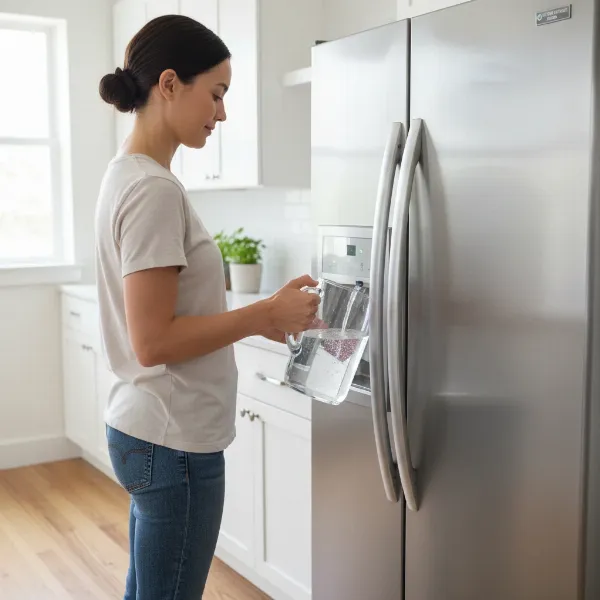 A person holding a large pitcher under a refrigerator's water dispenser, flushing a new water filter.
Under-Sink and Whole-House Water Filters
These systems typically require a more involved flushing process due to their larger capacity and connection to your main water lines.
- Installation & Leak Check: After installing the new filter cartridges into their housings, slowly turn on your main water supply. Check for any leaks around the filter housings.
- Open Flushing Valve (if applicable): If your system has a dedicated flushing valve or bypass, open it to direct water away from your internal plumbing.
- Run Water: Open a nearby cold water faucet (preferably the lowest one in the house for whole-house systems, or the filtered water tap for under-sink systems) and let the water run.
- Flush Duration: Flush the system for a minimum of 5 minutes, but often longer (10-15 minutes or more) until the water runs completely clear and all air has been purged. For whole-house systems, it’s beneficial to run water through multiple fixtures to ensure complete flushing of the lines.
- Close Valves: Once flushing is complete, close the flushing valve (if used) and then the open faucet.
Reverse Osmosis (RO) Systems
RO systems have a more rigorous flushing and conditioning process, often involving the storage tank.
- Initial Fills and Drains: After installing new pre-filters, the RO membrane, and post-filters, allow the system to fill the RO storage tank completely. Do not use this first tank of water. Drain the entire tank by opening the filtered water faucet and letting it run until the tank is empty. Repeat this fill-and-drain cycle 2-3 times. This step helps condition the membrane and flush out preservation chemicals.
- Final Flush: After the last drain, allow the tank to refill one more time. Then, flush the system by running water through the filtered water faucet for at least 10 minutes (or as per manufacturer recommendations) before normal use.
Special Case: Fluoride Filters
Some specialized fluoride removal cartridges require unique flushing.
> “If you have a fluoride removal cartridge, it’s crucial to flush it for a minimum of 10 minutes on its own before installing any subsequent cartridges. This prevents fine media from blocking other filters in your system.” – Water Filter Expert, WaterFilterToGo.com Admin
This separate flushing ensures that the fine media often present in fluoride filters doesn’t prematurely clog other filter stages. After the fluoride filter is flushed, you can install the remaining cartridges and proceed with the general system flushing.
The Risks of Skipping the Flush: What You Might Encounter
Neglecting to flush your new water filter might seem like a time-saver, but it can lead to several undesirable outcomes, compromising both your water quality and your filter’s performance.
The most common and immediate issue is an unpleasant taste and odor. Many filters contain activated carbon, which, when new, can release tiny carbon fines. If not flushed, these particles can give your water a slightly gritty or earthy taste. Additionally, manufacturing residues or even the plastic components themselves can impart a “new” or plastic-like flavor to your water. Without flushing, the filter media also isn’t fully activated, meaning it won’t immediately remove chlorine and other taste-altering chemicals, leaving your water tasting sub-par.
You might also notice visible contaminants in your filtered water. This often manifests as cloudy or grey water, or the appearance of small black specks floating in your glass or collecting in your ice cubes. These are typically the aforementioned carbon fines, which are harmless to consume but certainly unappealing. Air trapped in the system can also cause initial cloudiness due to micro-bubbles.
Skipping the flush can lead to reduced filtration performance and efficiency. Carbon fines, if not rinsed out, can prematurely clog the fine pores of your filter media or downstream filter stages, leading to slower flow rates and a reduced ability to remove contaminants. This early clogging means your filter isn’t working at its peak, and its overall lifespan can be significantly shortened. You’ll find yourself needing to replace cartridges sooner than expected, increasing your long-term costs. In some cases, if enough fine particles are released into your plumbing, it could even lead to issues with faucets or appliances connected to the filtered water supply.
Best Practices for Post-Flush Filter Maintenance
Flushing is an excellent start, but ongoing maintenance ensures your water filter continues to provide clean, great-tasting water for its entire lifespan.
Firstly, consistent use is beneficial. Water filters, particularly those with activated carbon, perform best when used regularly. Prolonged periods of inactivity can sometimes lead to bacterial growth within the filter media, especially if water remains stagnant inside. If you go away for an extended period (e.g., a vacation of several days or weeks), it’s wise to flush your filter briefly upon your return for a minute or two to ensure fresh water circulates through the system.
Secondly, adhering to the manufacturer’s replacement schedule is paramount. Every filter has a finite capacity for trapping contaminants. Attempting to extend the life of a filter beyond its recommended period can result in reduced filtration effectiveness, poor taste, and potentially even the release of previously captured contaminants back into your water.
Thirdly, monitor your water quality. Pay attention to changes in taste, odor, or clarity. These can be early indicators that your filter is nearing the end of its life or that there’s an issue with the system. While not recommended for consumption, the initial flushed water, often containing carbon dust, can sometimes be repurposed for non-potable uses like watering plants, as the carbon fines can even be beneficial to soil.
By following these simple best practices, you can ensure your water filter consistently delivers optimal performance and clean, refreshing water for your family.
Conclusion
Flushing your new water filter before its first use isn’t just a suggestion; it’s a fundamental step in ensuring your family enjoys the purest, freshest water possible. From purging microscopic carbon fines and trapped air to activating the filter’s media, this initial rinse safeguards against unpleasant tastes, cloudy water, and premature filter degradation. Taking a few extra minutes at installation ensures your investment delivers on its promise of superior water quality and a longer, more efficient filter life. Don’t skip this vital step—your health and taste buds will thank you. Are you ready to make proper water filter flushing a non-negotiable part of your home maintenance routine?
Frequently Asked Questions
How long should I flush my new water filter?
The flushing time varies by filter type. Pitcher and faucet filters usually require a few minutes, while refrigerator filters need 3-5 gallons. Under-sink and whole-house systems often require 5-15 minutes, and RO systems typically involve multiple tank fills and drains, followed by a 10-minute flush. Always check your specific manufacturer’s instructions for the most accurate duration.
Can I use hot water to flush a new filter?
No, it is generally recommended to use cold water when flushing a new Water Filter. Hot water can sometimes damage the filter media or compromise its structural integrity, particularly for carbon-based filters. Always stick to cold water for the flushing process unless the manufacturer explicitly states otherwise.
Why is my water cloudy or has black specks after installing a new filter?
Cloudy water or black specks are usually caused by carbon fines, tiny harmless particles that are a byproduct of the activated carbon manufacturing process. Air bubbles trapped in the system can also cause temporary cloudiness. Proper flushing is designed to remove these before you start consuming the water. Continue flushing until the water runs clear.
What are carbon fines?
Carbon fines are small, harmless particles of activated carbon that can break loose from the filter media during manufacturing or shipping. When you first install a new carbon filter, these fines can be released into your water, making it appear cloudy or leaving small black specks. Flushing the filter removes these particles.
Is flushing the same as sanitizing?
No, flushing is not the same as sanitizing. Flushing removes loose particles, air, and conditions the filter media. Sanitizing, typically done with a mild bleach solution, is a separate process used to kill bacteria in the filter housing or lines, usually performed during initial installation for whole-house systems or after long periods of disuse, and is usually done before installing new filters or an RO membrane.