An annoying gurgling, hissing, or humming from beneath your sink can quickly turn the convenience of a reverse osmosis (RO) system into a source of frustration. While RO systems are celebrated for delivering pristine drinking water, the sounds emanating from a noisy reverse osmosis drain line are anything but refreshing. This guide will walk you through the common culprits behind these unwanted noises and provide practical, step-by-step solutions to restore peace and quiet to your kitchen.
What is a Reverse Osmosis System and Why Does the Drain Line Make Noise?
|
Our Picks for the Best Water Filter in 2026
As an Amazon Associate I earn from qualifying purchases.
|
||
| Num | Product | Action |
|---|---|---|
| 1 | FRIGIDAIRE ULTRAWF Pure Source Ultra Water Filter, Original, White, 1 Count |

|
| 2 | Brita Metro Water Filter Pitcher with SmartLight Change Indicator, BPA-Free, Replaces 1,800 Plastic Water Bottles a Year, Lasts Two Months, Includes 1 Filter, Small - 6-Cup Capacity, White |
|
| 3 | Brita UltraMax Large Water Dispenser With Standard Filter, BPA-Free, Reduces Copper, Cadmium and Mercury Impurities, Lasts 2 Months or 40 Gallons, Includes 1 Filter, Kitchen Accessories, Large 27-Cup |
|
| 4 | everydrop® by Whirlpool Refrigerator Water Filter A - EDRARXD1 (Pack of 1) |
|
| 5 | E-3000UV Whole House Salt-Free Water Softener & Filter Combo with UV |
|
| 6 | everydrop by Whirlpool Ice and Water Refrigerator Filter 1, EDR1RXD1, Single-Pack , Purple |
|
| 7 | GLACIER FRESH Water Filter Compatible with XWFE (Built-in CHIP), Replacement for GE XWFE, XWF Refrigerator Water Filter NSF/ANSI 42 Certification Pack of 1 |
|
| 8 | Samsung HAF-QIN/EXP Genuine Refrigerator Water Filter, Reduces 99% of Harmful Contaminants for Clean, Clear Drinking Water, 6-Month Life, Easy Install, Pack of 1 |
|
| 9 | ZeroWater 20-Cup Ready-Pour 5-Stage Water Filter Dispenser with 0 TDS Water Filter – IAPMO Certified to Reduce Lead, Chromium, and PFOA/PFOS |
|
| 10 | ZeroWater 32-Cup 5-Stage Water Filter Dispenser with Instant Read Out - 0 TDS for Improved Tap Water Taste - IAPMO Certified to Reduce Lead, Chromium, and PFOA/PFOS |
|
A reverse osmosis system works by forcing tap water through a semi-permeable membrane, effectively removing impurities, dissolved solids, and contaminants to produce pure drinking water. The rejected contaminants and a portion of the wastewater are then directed away from the system through a dedicated drain line. This continuous process of rejecting impurities is essential for the system’s function.
However, the very act of this reject water flowing down the drain can generate noise. Several factors contribute to a noisy RO drain line, including high water pressure, loose connections, restricted water flow, or even air trapped within the system. Understanding the root cause is the first step toward a quiet operation.
Identifying the Source of the Noise: A Troubleshooting Guide
Before attempting any fixes, accurately pinpointing the origin of the noise is crucial. This systematic approach will help you diagnose the problem efficiently. Begin by turning on your RO faucet to activate the system and listen closely. Try to isolate the sound: Is it a gurgle, a hiss, a hum, or a whine? Does it seem to come from the drain line itself, the connections, or another part of the RO unit? Carefully check all tubing and connections for any visible leaks or bends, as these can restrict water flow and amplify sounds. Sometimes, simply observing the water flow into the drain can give clues about its consistency and potential issues.
Common Causes and Solutions for a Noisy RO Drain Line
Identifying the specific cause of your RO drain line noise is key to finding the right solution. While many systems share similar designs, minor variations can influence how noise manifests.
High Water Pressure
Problem: Excessive incoming water pressure can force water through the drain line too rapidly, creating turbulence and noise. This often results in a loud, rushing sound.
Solution: Installing a water pressure regulator on your main water line can significantly reduce the pressure entering your RO system, mitigating this issue. Aim for pressure within your RO system’s recommended operating range, typically between 40-60 PSI.
Loose Connections or Hoses
Problem: Vibrations from water moving through the drain line can be amplified by loose fittings, tubing, or components, leading to rattling or humming sounds.
Solution: Systematically check all connections, especially those around the drain saddle valve and where the drain line connects to the main drainpipe. Gently tighten any loose nuts or clamps. Ensure tubing is straight and not bent, which can restrict flow and cause whistling.
Restricted or Clogged Drain Line
Problem: Sediment, mineral buildup, or physical obstructions (like kinks in the tubing) can restrict the flow of reject water, creating back pressure and gurgling noises. A partial clog can cause water to “bubble” as it tries to pass through.
Solution: Disconnect the drain line from the drain saddle and inspect it for any visible clogs or kinks. You can try flushing the line with warm water. If the saddle valve itself seems blocked, you may need to remove it and clear any debris from the drilled hole in the drainpipe.
Improper Drain Saddle Valve Installation
Problem: If the hole drilled for the drain saddle valve is too small, off-center, or has burrs, it can restrict water flow and cause significant noise. On new installations, a loud noise often points to incorrect setup.
Solution: Turn off your water supply and remove the drain saddle valve. Carefully inspect the hole in the drainpipe. If it’s too small or rough, you may need to re-drill it to the correct size (usually 1/4 inch or 3/8 inch, depending on your system) and ensure it’s free of burrs. Positioning the drain saddle on the crossover pipe, rather than directly under the sink, can also help reduce amplified sound.
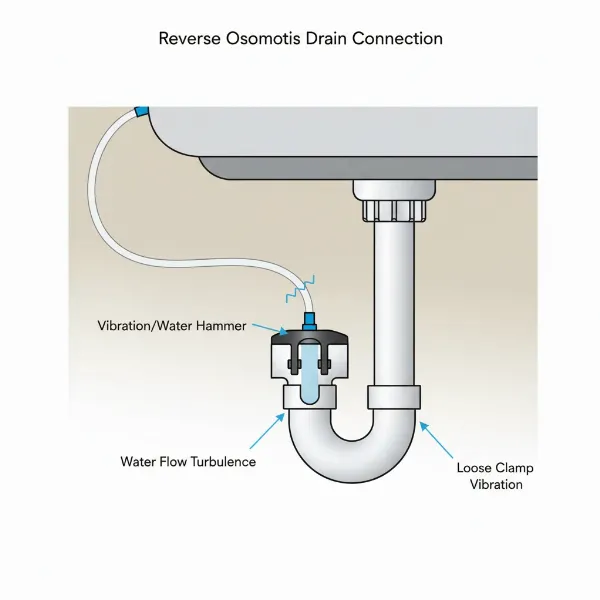 Diagram showing common RO drain line connections under a sink to illustrate noise points
Air in the System
Problem: Air pockets trapped within the RO system, particularly in the check valve or during initial startup, can cause gurgling, whining, or humming noises as water tries to push through. This is common with new installations or after filter changes.
Solution: To purge air from the system, close the tank’s valve. Then, repeatedly turn on the RO spigot for about a minute, then turn it off for 10 seconds, doing this 3-4 times. This helps force air out through the spigot, bypassing the tank. If the check valve is the primary issue, sometimes gently tilting the RO system can help dislodge air bubbles.
Faulty Flow Restrictor
Problem: The flow restrictor regulates the amount of reject water going to the drain. If it’s blocked, damaged, or the wrong size, it can create excessive pressure or insufficient flow, leading to noise or constant draining.
Solution: Inspect the flow restrictor for any blockages. If it appears damaged or if the noise persists after other troubleshooting steps, replacing the flow restrictor with one specifically designed for your RO membrane’s GPD (gallons per day) rating might be necessary.
Vibration from the System Pump (if applicable)
Problem: Some RO systems include a booster pump to increase water pressure. If the pump isn’t properly mounted or is aging, its vibrations can transmit through the system and plumbing, contributing to drain line noise.
Solution: Ensure the pump is securely mounted and consider adding vibration-dampening pads underneath it. If the pump is old or frequently making loud noises, it might be nearing the end of its lifespan and require replacement.
Step-by-Step Guide to Fixing Your Noisy RO Drain
Ready to tackle the noise? Follow these steps to systematically troubleshoot and resolve the issue. Always remember to prioritize safety by shutting off the water supply before disconnecting any lines.
Step 1: Shut Off Water Supply
Locate the cold water supply valve under your sink, which feeds the RO system, and turn it off. Also, close the valve on top of your RO storage tank. This prevents water spills and accidental system activation during your work.
Step 2: Inspect and Tighten Connections
With the water off, meticulously check every connection point on your RO system, especially the drain line tubing leading to the drain saddle valve. Gently wiggle the tubing and fittings. If anything feels loose, tighten the compression nuts or hose clamps. Ensure there are no sharp bends or kinks in the tubing that could impede flow.
Step 3: Clear the Drain Line and Inspect Saddle Valve
Disconnect the drain line from the drain saddle. Inspect the end of the tubing for any visible debris. Next, unscrew the drain saddle valve from the drainpipe. Look inside the drainpipe’s drilled hole for any obstructions or mineral buildup. Use a small wire or drill bit (carefully, by hand) to clear any blockages. Ensure the hole is clean, round, and the correct size for your system. Reattach the drain saddle valve securely, making sure the drain line is fully inserted.
Step 4: Check the Flow Restrictor (if accessible)
Depending on your RO system’s design, the flow restrictor might be a small component inserted into the drain line tubing or integrated into the membrane housing. Inspect it for any visible clogs. If it’s a separate component, you might be able to remove and clean it, or replace it if it appears damaged.
Step 5: Address Water Pressure
If you suspect high water pressure is the culprit, consider installing a pressure reducing valve on your cold water line if you don’t already have one. This helps regulate the input pressure to your entire plumbing system, benefiting not just your RO but other appliances as well.
Step 6: Purge Air from the System
Air trapped in the system is a common cause of gurgling. To purge it, ensure your RO tank valve is closed. Open your RO faucet completely and let it run until water stops flowing, then close it. Repeat this process 3-4 times. This helps push any trapped air out through the faucet. Finally, open the tank valve again.
“A significant number of RO drain line noise issues stem from incorrect initial installation, particularly with the drain saddle valve. Ensuring a clean, properly sized, and burr-free hole is crucial for quiet and efficient operation.” – Michael Chen, Certified Water Quality Specialist
When to Call a Professional
While many noisy RO drain line issues can be resolved with DIY troubleshooting, there are times when professional help is advisable. If you’ve tried all the above steps and the noise persists, or if you’re uncomfortable performing any of the maintenance tasks, it’s best to contact a qualified plumber or water filtration technician. They have specialized tools to diagnose complex problems, such as internal membrane issues, faulty automatic shut-off valves, or hidden plumbing problems that might be contributing to the noise. Don’t hesitate to seek expert assistance to protect your investment and ensure your water quality.
Maintaining Your RO System to Prevent Future Noise
Proactive maintenance is key to a long-lasting and quiet reverse osmosis system. Regularly changing your filters and RO membrane according to the manufacturer’s recommendations is paramount. Inspect all tubing and connections for wear and tear, and tighten any that appear loose. Periodically check your water pressure to ensure it remains within the optimal range. When installing new components or filters, always ensure they are correctly seated and all air is properly purged from the system before resuming normal operation. These simple habits can save you from future headaches and ensure a continuous supply of pure, quiet water.
Conclusion
A noisy reverse osmosis drain line is more than just an annoyance; it’s often a signal that something in your system isn’t running as smoothly as it should. From simple fixes like tightening loose connections or purging air, to more involved solutions like adjusting your drain saddle valve or managing water pressure, identifying the root cause is the first step towards a quieter kitchen. By understanding your RO system and applying these practical troubleshooting steps, you can effectively silence those unwelcome sounds. Don’t let a noisy drain deter you from enjoying the benefits of pure, filtered water. What quiet water solutions have you discovered in your home?
Frequently Asked Questions
Why does my RO drain line gurgle loudly after installation?
Gurgling after installation is often due to air trapped within the system as it fills for the first time. It can also be caused by an improperly installed drain saddle valve, leading to restricted flow or turbulence, which can usually be resolved by checking connections and purging air.
Can high water pressure cause my RO drain to make noise?
Yes, high water pressure is a common culprit. Excessive pressure forces reject water through the drain line too quickly, creating turbulence and a loud rushing or hissing sound. Installing a pressure regulator can effectively mitigate this issue.
How often should I check my RO drain line for clogs?
It’s a good practice to visually inspect your RO drain line and its connections whenever you change filters, typically every 6-12 months. If you notice a reduction in flow or increased noise, check for clogs or kinks immediately.
Is it normal for an RO system to make some noise?
A slight, consistent trickling sound from the drain line when the system is actively producing water is normal. However, loud gurgling, hissing, or whining noises are indicative of an issue that needs investigation.
How do I know if my RO system’s flow restrictor is faulty?
A faulty flow restrictor can cause either constant draining (if it’s not restricting enough) or excessive noise and poor water production (if it’s blocked). If you’ve ruled out other common causes, a damaged or clogged flow restrictor might be the problem and may require replacement.